

These instructions are meant to supplement your Shopsmith materials. Do NOT attempt to adjust or repair your Shopsmith without the proper Shopsmith instructions.
Replacing a speed changer is a bit tricky. If youíre very handy, you might try this.

Turn the machine on, and run up the speed to its highest setting.

Shut it off and unplug it.


Remove the belt cover. Remove the drive belt from the motor pulley by gently sliding off one side of the belt and rotating the motor shaft so that belt will ride off entirely. (Sorry, but I donít have a picture of this step.)

Remove the name plate (on the back of the headstock). The easiest way to do this is to pop it off with a screwdriver.

This is speed changer as viewed through the access hole.
Shopsmith says that youíre supposed to depress the leaf spring on the back of the quadrant and swing the retaining loop out of the way. This is done inside of the machine, so itís impossible for me to get a photo, but the next two photos should explain everything.

This is the speed control assembly after itís been removed from the Shopsmith, and you can see that Iím depressing the leaf spring.

This is a shot from inside of the Shopsmith. This is the retaining-loop. Normally, it is hooked over the leaf spring that you saw in the last photo. Once the leaf spring is depressed, you sort of roll the retaining-loop off of the leaf spring. Itís not the easiest thing in the world, but, with a little patience, it can be done.

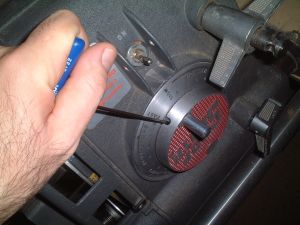
Remove the control handle with a 3/32 Allen wrench.

Remove the three large screws. (They are numbered in the photo.)

Everything will now come out. Notice the small spring. Make sure this stays in placeóI have let it fall into the motor pan on many occasions.
Replacing the speed control is the reverse of the procedure. Make sure the little spring is in place, and replace the speed dial. Then put the new speed control in the opening in the headstock and replace the three screws and flat spring. Turn the speed dial to the ďfastĒ setting.
Depress the leaf spring and slide the retaining loop back into its original position. This might take a while. On a good day I can do it in a few seconds, but the first time I tried it took about fifteen minutes.
Replace the control handle and tighten the set screw.
Replace the belt cover and name plate. Put the sanding disk on the machine and, while turning the disk by hand, slowly turn the speed control to "Slow."
Perform a high speed adjustment.
Afraid to try this yourself? If you live in Southern California, click here. Everybody else can contact Shopsmith at the link listed below.
Shopsmith Company Home Page