


an Open Back Banjo
PART II: BUILDING THE BODY (OR RIM)
Unlike neck wood, your choice of wood for the body will affect the tone of your instrument. Maple tends to be bright and crisp; mahogany produces a sweet tone; walnut is somewhere in between. East Indian rosewood yields a brassy tone, and Brazilian rosewood has a tone that is bold, brassy, and sweet.
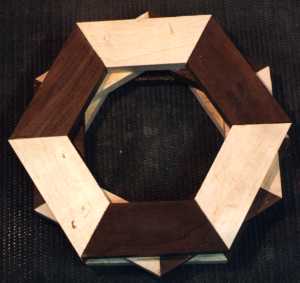
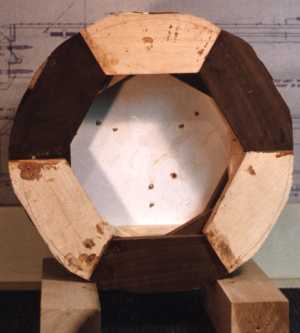
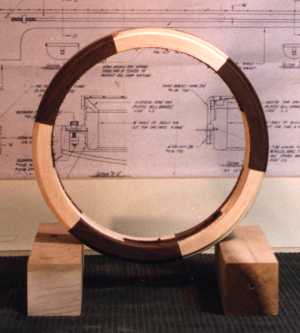
There are a few ways to build the body of the banjo, but my preference is to build up a body from eighteen wedge-shaped pieces of wood. Six pieces of wood are glued together to form a hexagon. This process is repeated twice, producing a total of three hexagons, which are glued together to form a three tiered block. This block is then cut to a rough round shape on the band saw, and made perfectly round on a lathe.
CONSTRUCTION OF AN EIGHTEEN PIECE LAMINATED BODY
For this type of instrument, six pieces of wood are glued together to form a hexagon. This process is repeated twice, to form three hexagons, which are glued together to formed a three tiered block which is turned on a lathe to make the banjo body.
STEP ONE:
The first thing you need to do is to cut the eighteen pieces of wood which are used to create the body. Each piece needs to be cut to a precise sixty degree angle. If you are off by only a degree, this error will be multiplied by the six joints, and you will have a real problem gluing it together.
I have tried using several different tools to cut the wood, but I've had the best results with a good electric miter saw with a sharp carbide-tipped blade. Cut 18 pieces of keystone-shaped wood. Sand lightly (if necessary), and test the pieces to make sure they fit snugly.
STEP TWO:
Glue six of the pieces together in a hexagon using a band clamp or gluing jig.

Most woodworking books recommend the use of a band clamp (sometimes called a belt clamp) to glue the pieces together. Although I started out using this method, the results were less than perfect. A band clamp exerts an equal pressure over the entire project, and it is not possible to increase the pressure in a troublesome spot. As a result, I built a gluing jig which handles the material quite neatly.
To properly use the jig, follow the procedure listed below.
- a. line the bottom of the jig with plastic or wax paper
- b. coat the edges of the pieces with glue
- c. place the pieces in the jig
- d. lightly tighten side clamps
- e. check for gaps
- f. finish tightening side clamps
STEP THREE:
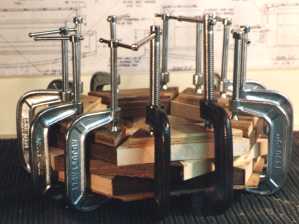
Glue the three hexagons together. To improve strength and stability, don't line up the glue joints in a neat stack. Stagger the glue joints, and arrange them so that they have visual appeal. Plan ahead. Don't wait until everything is smeared with glue to figure out what you're going to do.
Once you've made your plans, glue all three together at the same time, using ample glue and lots of clamps. Tighten the clamps until the glue oozes out.
STEP FOUR:
Let the block sit around for a few weeks so it settles and becomes stable.
STEP FIVE:
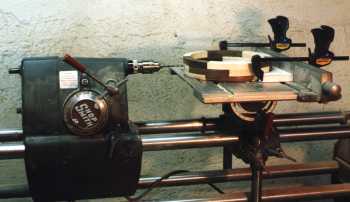
Attach the block to a face plate and trim it to a roundish shape to prepare for turning on the lathe.
I've tried a number of different methods, but what has worked best is to attach a round piece of scrap wood to the face plate with wood screws and then use Elmer's glue to attach the body block to the scrap wood. This enables me to shape both the inside and outside of the banjo body on the lathe.
Use the band saw to trim off the outside corners and turn the block into an approximate round shape.
STEP SIX:
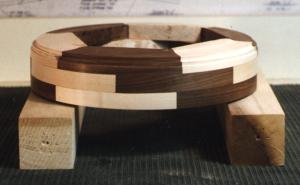 Using lathe tools, trim the body down to an outside diameter of approximately 11 1/2". Using a bowl gouge, cut the body to approximate shape. Stop every so often to measure. When you've got the rim turned to a diameter of 11 1/2", it's time to fit the tone ring.
Although I have read that the best way to fit the tone ring is to measure with a dial caliper, I have had excellent results just testing the fit of the tone ring against the rim. Every so often, I shut the machine off and see how the tone ring fits, taking off minute amounts of wood in between test fittings.
CAUTION: DO NOT OPERATE THE LATHE WITH THE TONE RING IN POSITION.
Fit of the tone is extremely important to the sound of the body. I take a lot of time to make sure that every part of the tone ring makes solid contact with the body, thereby transferring as much of the sound from the tone ring to the body as possible.
Once the tone ring has been fit, trim the rest of the body down so it is just a shade larger in diameter than the tone ring.
After that you can shape the inside of the body the same way as if you were making a bowl. The walls of the rim should be 3/4" thick.
Sand the body while still on the lathe.
Some woodworkers prefer to apply a friction finish while the work is on the lathe. I personally do not do that, but if you're going that route now would be the time to take care of that step.
STEP SEVEN:
Mark and drill holes for bracket shoes.
Marking the exact position for the bracket shoes can be a problem. Perhaps the easiest way is to use the tension hoop as a template. I find it useful to hold it in place with clamps while I'm marking the wood.
 Drilling the holes can be a problem, too. I have used my Shopsmith as a horizontal boring tool, but I used my benchtop drill press for my first banjo. The table on the press is so small that I can slip the body of the banjo over it.
This is also the time to drill the holes for the tailpiece, rim rod, and neck bolts. Check your blueprint and hardware for exact requirements.
STEP EIGHT: Attach the hardware to the body.
This is one of the most exciting steps of the entire process, because the body will quickly look like a finished product.
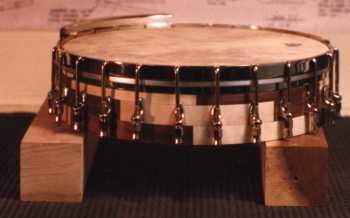
Put the tone ring in place. Make sure that it is seated all the way down.
Bolt all of the bracket shoes in place, but don't tighten them down too much. Just snug them up enough to hold them in place. Thread all of the brackets through the shoes and twist the nuts in place just enough to keep them from falling off.
Slip the head over the tone ring, and wiggle three or four brackets around to hold it in place. Tighten the brackets slightly. Tighten one a bit, then move to another, and keep going around. Don't try to tighten the head, just try to keep things in place so you can put on the rest of the brackets.
Go ahead and put the rest of the brackets in place and slightly tighten the nuts.
At this point, the head is probably wobbly and might be uneven. You should be able to tell if everything is lined up right, so you can take it all apart if you'd like. However, you'd probably like to tighten the head up just to see how things look.
Go slowly. The tension hoop should be even, and the head should be equal tightness all over. It is very possible to over-tighten the head and cause it to break (I've done it), so be careful.
Rap your fingernails against the head, and if it seems tight, leave it alone. You won't be stringing up the instrument at this point, so there's no point in tightening the head all of the way.
STEP NINE: Pre-Fit the Neck to the Body.

I've found that the easiest way to fit the neck to the body is to use a sanding drum in a drill press to bring the heel of the neck to shape. I don't have a template, but I've found that the little drawing of the neck heel in the Stewart MacDonald catalogue is good enough. Take it down a little at a time, and when you think you've got it close use a one-hand clamp to hold the neck in place on the rim. Put the bone nut blank in place and put a yardstick on the fingerboard. The yardstick should extend above the head with just enough for whatever bridge you're planning on using.
With the neck clamped in place, using a long thin marking device (maybe a pen filler, maybe a nail), mark the places where you will drill the holes for the lag bolts in the neck. Remove the neck, drill pilot holes for the lag bolts, and attach them to the neck.